This Blog is discontinued, its only read-only

Monday, October 17, 2016

Oracle Forms 12c - Setting up Forms Diagnostics Agent

With the Oracle Forms 12c Diagnostics Agent you can populate the DMS (Dynamic Monitoring Service) metrics for Oracle Forms 12c simply into Oracle Database Tables, which allows you to have a historical view on the Oracle Forms related Performance Data out of DMS.

The installation comes in 2 major parts, first setup a Oracle Database User and the underlying objects and second part deploy the Forms Diagnostics Agent into your Oracle WebLogic Server.

Database Setup Part

A first create the required user and create the required objects in your Oracle Database which is hosting the Metadata Repository for your Oracle Forms & Reports 12c installation. In the Software Home directory of your Oracle Forms & Reports 12c installation, you can find under the directory $ORACLE_HOME/forms two scripts, first one forms_create_diagnostics_user.sql and second forms_create_diagnostics_schema.sql
Connect with sqlplus as sysdba to your Oracle Database and perform following steps:
First you have to create the User for the Forms Diagnostics Agent, the SQL Script forms_create_diagnostics_user.sql will prompt you for the Username and the Pasword, here in my example its the Username = forms_diag and the Password = MySecretPwd12c

connect / as sysdba
@forms_create_diagnostics_user.sql
User id : forms_diag
Password : MySecretPwd12c
old   1: DROP USER &&userid
new   1: DROP USER forms_diag
DROP USER forms_diag
          *
ERROR at line 1:
ORA-01918: user 'FORMS_DIAG' does not exist

Commit complete.

old   1: CREATE USER &&userid
new   1: CREATE USER forms_diag
old   2: IDENTIFIED BY &&password
new   2: IDENTIFIED BY MySecretPwd12c

User created.

old   1: GRANT CONNECT, RESOURCE TO &&userid
new   1: GRANT CONNECT, RESOURCE TO forms_diag

Grant succeeded.

Commit complete.

Disconnected from Oracle Database 12c Enterprise Edition Release 12.1.0.2.0 - 64bit Production
With the Partitioning, OLAP, Advanced Analytics and Real Application Testing options

Important Notice: the above executed SQL Script provided by Oracle is not complete, as the created User doesn't have any privileges on the default tablespace USERS. In order to correct this, execute following command:

connect / as sysdba
alter user FORMS_DIAG quota unlimited on USERS;

As next we have to create the necessary objects within the above created User for the Forms Diagnostics Agent, connect to the Database as your newly created Forms Diagnostics Agent User and execute the second script forms_create_diagnostics_schema.sql

connect forms_diag/MySecretPwd12c
@forms_create_diagnostics_schema.sql
. . .
Table created.

Commit complete.

Disconnected from Oracle Database 12c Enterprise Edition Release 12.1.0.2.0 - 64bit Production
With the Partitioning, OLAP, Advanced Analytics and Real Application Testing options

WebLogic Server Setup Part

Now you have to create a new Data Source within the Oracle WebLogic Server which is used for your Oracle Forms & Reports 12c environment.

Connect with a browser to your WebLogic Server Console via http://servername:adminport/console and login as weblogic user.
Navigate in the Domain Structure to "Domain / Services / Data Sources" and create a new Data Source by clicking the button "New".


Choose as new Data Source "Generic Data Source"


Provide a Name for the new Data Source of your choice and set the JNDI Name to "oracle/forms/agentDS"


Leave the new screen untouched and proceed with the button "Next"


Leave the new screen untouched and proceed with the button "Next"


Provide the Database Name which is hosting your Forms Diagnostics Agent User, the Hostname of the Database Server, Oracle Listener Port, Database Username and two times the password


As next you have to test the Data Source by clicking the button "Test Configuration"


If the test is successful, you should see following message:


As Target, select your Admin Server for your Oracle WebLogic Server.


The next step is to deploy the Forms Diagnostics Agent war file. Navigate in the Domain Structure to "Domain / Deployments", activate in the Change Center the Lock & Edit Mode and click under Configuration of the Deployments the button "Install"


Set the Path to your $ORACLE_HOME/forms/j2ee/formsagentapp.war and proceed with the button "Next"


Verify that "Install this deployment as an application" is marked and proceed with the button "Next"


Choose as deployment target the Admin Server of your Oracle WebLogic Server and proceed with the button "Next"


Leave the next screen untouched and proceed with the button "Finish"


Finally activate your deployment with the button "Activate Changes" under the Control Center.


Under your deployments you can find now your newly deploy Forms Diagnostics Agent named "formsagentapp". The deployment is currently in the State "Prepared". Simply click the "formsagentapp"


Under the Control tab of the "formsagentapp", mark the checkbox in front of the formsagentapp and click the button "Start / Servicing all requests"


Confirm the Application Start with the button "Yes"


Finally you should see the formsagentapp in the State "Active"


Now we can login to the Forms Diagnostics Agent Console via http://servername:adminport/formsagent/AgentConsole.jsp, provide at first the weblogic username and his password and proceed with "Submit"


Within the Forms Diagnostics Agent Console we can start and stop the Agent and define the frequency of the data collection.


After you activated the Agent, you should see following within the Forms Diagnostics Agent Console.


That's the complete configuration and activating of the Forms Diagnostics Agent, now we can start some Oracle Forms, perform some activities in the Oracle Forms and check what we can see under the tables of the Forms Diagnostics Agent User in the Oracle Database.

There 10 tables under the Forms Diagnostics Agent User:

  • ADMIN_SERVER
    • Contains information about the Oracle WebLogic Server Admin Server
  • AGENT
    • Holds informations about all executed data collections, like Collection Timestamp, Frequence in minutes and so on
  • FRM_DB
    • Holds information about the database connects used in the Oracle Forms Applications
  • FRM_DB_LOGIN
    • unfortunatelly not populated, seems there is an unexpected feature :-)
  • FRM_RUNTIME
    • Holds information about the used formsweb.cfg configuration section used for the Forms Application, Connect and Disconnect Time, Starting Form Name, Current Forms Status (Running, Exited), CPU Time on Exit and so on.
  • FRM_TRACE
    • Holds information about the Forms Trace File if enabled
  • FRM_TRACE_USE
    • Holds detailed information about Forms Trace if enabled
  • FRM_USER
    • Holds information about user, IP address and if used SSO Login Name
  • HISTORY
    • Holds historical data of all captured Forms Application Executions, like Number of Bytes send and received, Network Round Trips, CPU Time and so on
  • WLS_APP
    • Holds information about the underlying Oracle WebLogic Managed Server hosting the Forms Servlet

With the Forms Diagnostics Agent it's really simple to collect all necessary DMS metric data within a couple of tables and enables you easily to have a look some specific Performance Data.


Tuesday, October 11, 2016

OTN Appreciation Day: WebLogic

Based on the suggestion by Tim Hall's Blogpost here is my contribution to the OTN Appreciation Day:

I've got 2 features and as usual these features are related to Oracle WebLogic Server:

1st Oracle WebLogic Server & Docker

The official support and certification for Oracle WebLogic Server on Docker started nearly one year ago. Since the first support and certification of Oracle WebLogic Server on Docker there were a lot of things happening, support and certification has been continuously extended to the latest release of Oracle WebLogic Server 12.2.1.1, Oracle (specially Bruno Borges) is driving a great GitHub Repository which provides you nearly everything around Oracle WebLogic Server and Docker.

The combination of Oracle WebLogic Server and Docker is really a game changer for how people like me are working now with Oracle WebLogic Server, it forces you to rethink your old techniques on how to design, install, maintain and specially monitor your WebLogic Infrastructure.
But on the other hand it also gives you new opportunities on how to work closer with the Developers (DevOps).

If you want to learn more about Oracle WebLogic Server on Docker, I strongly recommend to have a look on following stuff:


2nd Oracle WebLogic Server & RESTFul Management Services

REST is normally more a classical Developer topic, but since Oracle introduced the RESTFul Management Services in Oracle WebLogic Server 12.1.2 it has become also a topic for Administrators. The RESTFul Management Services are providing you the option to monitor your entire Oracle WebLogic Server including all deployed applications, integrated resources like JDBC, JMS and so on, moreover you can administer your entire WebLogic Server, like creating new Managed Servers, deleting resources, deploying applications and so on, just with a http request performed for example by a simple cURL command.
The response performance of cURL based RESTFul Management Service request to retrieve some performance metrics of your WebLogic Server compared to the classical scripting via Python and executed by wlst is simply incredible.
Specially the RESTFul Management Services are getting more and more interesting, as many environment are moved to the Cloud and with the lack of direct access to the Operating System, your main way of administer your WebLogic Server environment is now via RESTFul Management Services.

For more informations on WebLogic Server RESTFul Management you may have a look on following stuff:


Happy OTN Appreciation Day to all of you :-)

Friday, October 7, 2016

Oracle Forms 12c - Multiple Managed Servers

You might remember the previous method to create multiple Managed Servers for Oracle Forms 11g, which can be found under the My Oracle Support Note 989118.1. This procedure were quite a bit critical, as you had to provide manually several arguments and classpath entries for the cloned Managed Server.

With Oracle Forms 12c the procedure to create (not cloning) additional WebLogic Managed Servers hosting your formsapp is really straight forward as you perform this with the config.sh (config.cmd for Windows) tool.

Let's say you will need an additional WebLogic Managed Server for your HR Forms Application which should reside in an independent Managed Server.
Connect to your Server on which your Oracle Forms & Reports are running and perform following steps:

cd $ORACLE_HOME/oracle_common/common/bin
./config.sh

On the first screen, choose the Option "Update an existing domain" and set your Domain Location to the correct directory and proceed with "Next"


Leave the next screen as it is and proceed with "Next"


All values should be automatically pre-filled and just test with the button "Get RCU Configuration" that you have a connection to your Repository Database for Oracle Forms 12c and finally proceed with "Next"


Leave the pre-filled values as they are and proceed with "Next"


Leave everything like it is and proceed with "Next"


In the screen "Advanced Configuration" tick the checkbox for "Managed Servers, Clusters and Coherence" as we will here add our new additonal WebLogic Managed Server for hosting the formsapp


In the screen "Managed Servers" add a new Managed Server by clicking the button "Add" and provide all required values:

  • Name of your Managed Server, in this example WLS_FORMS_HR
  • Listen Address
  • Listen Port, in this example I choose 9011
  • Optionally enable SSL and provide if you enable SSL the SSL Listen Port
  • Server Group, this is the important part, select the Server Group "FORMS-MAN-SRV"

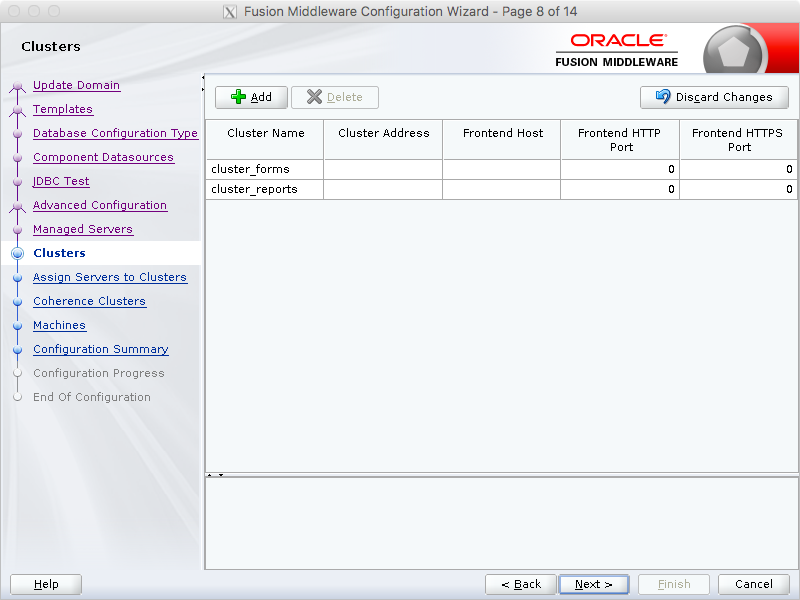
In the screen "Clusters" change nothing and proceed with "Next"


Under the screen "Assign Servers to Clusters" mark in the column "Servers" your newly created Managed Server (in this example WLS_FORMS_HR") and move the Managed Server by clicking the arrow button to the "cluster_forms" section under the column "Clusters"


After moving the WLS_FORMS_HR Managed Server you should see following screen and proceed with "Next"


In the screen "Coherence Clusters" just proceed with "Next"


In the screen "Machines" just proceed with "Next"


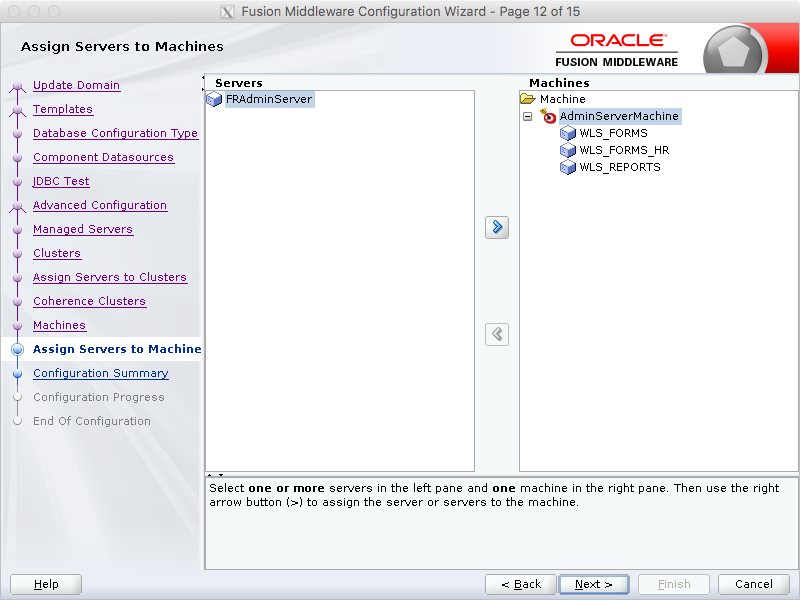
In the screen "Assign Servers to Machines" mark your newly created Managed Server "WLS_FORMS_HR" and move it by clicking the arrow button under your Machine


After moving the WLS_FORMS_HR Managed Server you should see following screen and proceed with "Next"


In the screen "Configuration Summary" click the button "Update" to perform the creating of your new Managed Server hosting the formsapp


Wait until the Configuration Progress is complete and proceed with "Next"


Close the screen "End of Configuration" with "Finish"


After that you need to restart your Admin Server, connect to your server on which your Oracle Forms & Reports are installed and restart your Admin Server

cd $DOMAIN_HOME/bin
./stopWebLogic.sh
cd ..
nohup ./startWebLogic.sh >/dev/null 2>&1 &

The connect to your Oracle WebLogic Server Console http://servername:7001/console and you will find your newly created Managed Server under the "Domain Structure / Environment / Servers"


Go to the "Control" Tab and startup your new Managed Server (in this example WLS_FORMS_HR). Click the checkbox in front of your Managed Server and click the button "Start"


Confirm the Startup with the button "Yes"


After some time you should see in the Configuration tab that your new Managed Server is up and running


If you connect finally to your Fusion Middleware Control 12c http://servername:7001/em and navigate to the "Forms / forms1" section


You will find your new Managed Server (in this example WLS_FORMS_HR) already integrated with all necessary configuration options like

  • Web Configuration
  • Environment Configuration
  • Font and Icon Mapping
  • Servlet Log


and as usual under the directory $DOMAIN_HOME/config/fmwconfig/servers/<new_Managed_Server>/application/formsapp_12.2.1/config you will find all your necessary configuration files:

cd $DOMAIN_HOME/config/fmwconfig/servers/WLS_FORMS_HR/applications/formsapp_12.2.1/config/
ls -la
drwxr-x---. 3 oracle oinstall  4096 Oct  7 10:13 .
drwxr-x---. 3 oracle oinstall    19 Oct  7 10:10 ..
-rw-r-----. 1 oracle oinstall  4422 Oct  7 10:13 default.env
-rw-r-----. 1 oracle oinstall  4128 Oct  7 10:10 default.env.jmxori
-rw-r-----. 1 oracle oinstall 10629 Oct  7 10:10 formsweb.cfg
-rw-r-----. 1 oracle oinstall 10629 Oct  7 10:10 formsweb.cfg.jmxori
-rw-r-----. 1 oracle oinstall   562 Oct  7 10:10 IdentityStoreConfig.xml
-rw-r-----. 1 oracle oinstall   562 Oct  7 10:10 IdentityStoreConfig.xml.jmxori
-rw-r-----. 1 oracle oinstall   350 Oct  7 10:10 logmetadata.xml
-rw-r-----. 1 oracle oinstall   350 Oct  7 10:10 logmetadata.xml.jmxori
drwxr-x---. 3 oracle oinstall    18 Oct  7 10:10 oracle

Finally you can access the new formsapp with http://<servername>:<port_of_new_Managed_Server>/forms/frmservlet

With the above shown method its really simple to create multiple Managed Servers hosting the formsapp in order to separate different Oracle Forms Application by placing them on individual Managed Servers.

Thursday, October 6, 2016

Oracle Enterprise Manager 13.2.0.0 available

Since yesterday the new release of the Oracle Enterprise Manager 13.2.0.0 is available for download on Oracle Technology Network under following link: http://www.oracle.com/technetwork/oem/enterprise-manager/downloads/index.html


The new Oracle Enterprise Manager 13.2.0.0 is available for following Operating Systems:

  • Linux x86-64
  • Windows x86-64
  • Solaris Operating System (SPARC)
  • Solaris Operating System (x86-64)
  • IBM AIX on POWER Systems (64-bit)
  • HP-UX Itanium (64-bit)
As well there are matching Database Templates available for the pre-configured Repository Database. For the new Oracle Enterprise Manager 13.2.0.0 you get this time Database Templates for Single Database and as well Database Templates for PDB


The documentation for the new Oracle Enterprise Manager 13.2.0.0 can be found under http://docs.oracle.com/cd/E73210_01/index.htm


The most new features are implemented for the Oracle Fusion Middleware stack, which is in my opinion the best :-) Some of the new features are:

  • Start and stop operations can be performed against the Oracle WebLogic Node Manager directly from the Enterprise Manager 13.2.0.0 console
  • SOA Management:
    • Heat Map for SOA Composites
    • Integration of Integrate Workload Statistics (IWS)
  • Multitenancy Management of Oracle WebLogic directly from Enterprise Manager 13.2.0.0 console
Happy download and testing :-)


Wednesday, October 5, 2016

Configure TNS_ADMIN variable for Oracle Reports 12c

In many case you struggle with the location of the tnsnames.ora file under Oracle Reports 12c. The default location for the tnsnames.ora is placed within your WebLogic Domain Home directory $DOMAIN_HOME/config/fmwconfig/tnsnames.ora

But in many case you have already a defined TNS_ADMIN variable which is pointing to a central location, e.g. $ORACLE_BASE/network/admin and maintaining various copies of a tnsnames.ora is not really useful and will cause various problems.

In order to instruct your Oracle Reports Server to use your central location for the tnsnames.ora simply add the necessary variable TNS_ADMIN in the provided rwserver.sh script under your $DOMAIN_HOME/reports/bin directory:

#!/bin/sh
#
# Copyright (c) 1999, 2015, Oracle and/or its affiliates. All rights reserved.
#
# Add Variable TNS_ADMIN and align to your location
TNS_ADMIN=/u00/app/oracle/network/admin
export TNS_ADMIN

DOMAIN_HOME=/u00/app/oracle/user_projects/domains/fr_domain
export DOMAIN_HOME

. ${DOMAIN_HOME}/reports/bin/reports.sh

exec nohup $ORACLE_HOME/bin/rwserver "$@" | tee -a reports.log

After you have done the above changes, restart your Oracle Reports Server with follwoing commands:

cd $DOMAIN_HOME/bin
./stopComponent.sh <your_Reports_Server_Name>
./startComponent.sh <your_Reports_Server_Name> 

Finally validate with the rwservlet command showenv, if the TNS_ADMIN variable is correctly assigned to your Reports Server, http://<servername>:<port>/reports/rwservlet/showenv?server=<Your_Reports_Server_Name>

Under the section "Oracle Reports Services - Server and Engine Environment Variables" you can see the definition of your TNS_ADMIN variable:


Wednesday, September 21, 2016

Configure jobStatusRepository in Oracle Reports 12c

Within this blog post I will show you how to configure the Oracle Reports 12c jobStatusRepository against an Oracle Database.

Within Oracle Reports since release 11.x a major change is, that within the jobStatusRepository configuration, we have now to use an entry in the Credential Store Facility (CSF).

At first create in your target database for the Reports Server Queue a user:

create user rwadmin identified by "Oracle12c" default tablespace users quota unlimited on users;
grant create table to rwadmin;
grant create view to rwadmin;
grant create trigger to rwadmin;
grant create procedure to rwadmin;
grant create sequence to rwadmin;

After you have created your user for the Reports Server Queue, go to the $ORACLE_HOME/reports/admin/sql directory of your Oracle Forms & Reports Installation, open a sqlplus and connect to your target database with the above created user and execute the rw_server.sql. This will create all necessary and required objects for the Reports Server Queue.

SQL> connect rwadmin/Oracle12c@<your tnsnames_entry>
SQL> @rw_server.sql

As next we need to create an entry in the Credential Store Facilty. For this connect to your Enterprise Manager for Fusion Middleware http://server:port/em and select from the WebLogic Menu the Option "Security / Credentials"


Here we need to create a Map


Providing a Map Name, e.g. reports and confirm with OK


After creating the Map, you should see as following and we can now create a Key attached to our Map.


Provide following informations:

  • Select the Map, in this example "reports"
  • Leave Type with "Password"
  • Provide User Name = choose Oracle Database User from above
  • Prove the Password of the Oracle Database User 2 times
  • Optionally you can provide a description


After you have created the Key, you should see following:


The next step would be normally to invoke the System MBean Browser in order to configure your jobStatusRepository, but as there is a small "unexpected feature" (some people call it even a bug :-) ), I will go now directly into the configuration file of the underlying Reports Server and add the necessary elements.

Simply go to the Directory $DOMAIN_HOME/fr_domain/config/fmwconfig/components/ReportsServerComponent/<your_reports_server_name> and open the configuration file rwserver.conf with an editor.

In case you are using the System MBean Browser to configure the below settings, the System MBean Browser will not add the necessary class reference "oracle.reports.server.JobRepositoryDB" and will cause that you can not startup your Reports Server.

For the below configuration provide the following values:

  • dbpassword = csf:<Your_Map_Name>:<Your_Key_Name>
  • dbconn = <Your_DB_Servername>:<LISTENER_PORT>:<ORACLE_SID>
  • dbuser = <Your_DB_Username>

   <jobStatusRepository class="oracle.reports.server.JobRepositoryDB">
      <property name="dbpassword" value="csf:reports:reports_repository"/>
      <property name="dbconn" value="forms12:1521:FRREPO"/>
      <property name="dbuser" value="rwadmin"/>
   </jobStatusRepository/>

Finally restart your Reports Server

cd $DOMAIN_HOME/bin
./stopComponent.sh <Your_Reports_Server_Name>
./startComponent.sh <Your_Reports_Server_Name>

Now you can generate a Report and you should be able to see the executed Reports in your Reports Server Queue in the Database


Wednesday, September 14, 2016

Microsoft SQL Server under Linux - Preview

Today something off topic, as I am normally blogging about Oracle Fusion Middleware stuff.

Microsoft SQL Server under Linux - Preview ... many of you (specially the Oracle Guys) might think now "WHAT ????", but its really true.
Some months ago Microsoft announced that they will release a SQL Server Version for Linux and I was lucky to get into the Preview Program.

The installation of the SQL Server under Linux (currently supported under Ubuntu 16 or RedHat 7) is quite easy and its completed in around 15 minutes (depending of your download speed).

What is quite cool, is that the SQL Server can also be installed under Docker :-)

It's really SQL Server under Linux :-)


As a native UNIX User I recognised one small thing, which were disturbing me, when you want to restore a Database Backup you have to use Windows Path notations which will be internally mapped to UNIX Path notations, but I am pretty sure that within the next Releases or at least with the final Release this small problem will be adjusted.


From the first look, SQL Server on Linux looks quite interesting.

Tuesday, August 30, 2016

Integrating Critical Patch Updates (CPU) into your WebLogic Server on Docker

Bruno Borges is doing a great job providing Docker Images for various Oracle WebLogic scenarios within the GitHub Repository https://github.com/oracle/docker-images/tree/master/OracleWebLogic

The provided samples are a real good starting point to create your Oracle WebLogic Servers and Domains including sample application.

But I personally miss one point within the Installation process of the Oracle WebLogic Server, applying Critical Patch Updates.

The integration is really simple.
As an example I will take Bruno's build file https://github.com/oracle/docker-images/blob/master/OracleWebLogic/dockerfiles/12.2.1/Dockerfile.generic for the installation of the WebLogic Server 12.2.1 Generic Version and extend the Dockerfile with an apply of the Critical Patch Update July 2016 for Oracle WebLogic Server 12.2.1.0.0 (Patch No. 23094285).

As pre requirement download all the mentioned Software Files within Bruno's GitHub Repository and in addition download from My Oracle Support the Patch No. 23094285 (file name: p23094285_122100_Generic.zip) and place them into the dockerfiles/12.2.1 directory on your server.

As next modify the Dockerfile.generic as follows, see line no. 5 - Environment for CPUJuly2016 Patch Number


# Environment variables required for this build (do NOT change)
# -------------------------------------------------------------
ENV FMW_PKG=fmw_12.2.1.0.0_wls_Disk1_1of1.zip \
    FMW_JAR=fmw_12.2.1.0.0_wls.jar \
    CPUJULY2016=p23094285_122100_Generic.zip \
    ORACLE_HOME=/u01/oracle \
    USER_MEM_ARGS="-Djava.security.egd=file:/dev/./urandom" \
    PATH=$PATH:/usr/java/default/bin:/u01/oracle/oracle_common/common/bin

see line no. 4 - for copy of CPUJuly2016 file
# Copy packages
# -------------
COPY $FMW_PKG install.file oraInst.loc /u01/
COPY $CPUJULY2016 /u01/

see lines no. 8, 9 and 14 for the adjusting of the chown command. see lines no 12 and 13 for the extraction and apply of the CPUJuly2016 Patch see line no. 15 for the cleanup of the CPUJuly2016 file
# Setup filesystem and oracle user
# Install and configure Oracle JDK
# Adjust file permissions, go to /u01 as user 'oracle' to proceed with WLS installation
# ------------------------------------------------------------
RUN chmod a+xr /u01 && \
    useradd -b /u01 -m -s /bin/bash oracle && \
    echo oracle:oracle | chpasswd && \
    # Move chown command to an upper position in order to avoid permission problems while applying CPU patch
    chown oracle:oracle -R /u01 && \
    cd /u01 && $JAVA_HOME/bin/jar xf /u01/$FMW_PKG && cd - && \
    su -c "$JAVA_HOME/bin/java -jar /u01/$FMW_JAR -silent -responseFile /u01/install.file -invPtrLoc /u01/oraInst.loc -jreLoc $JAVA_HOME -ignoreSysPrereqs -force -novalidation ORACLE_HOME=$ORACLE_HOME INSTALL_TYPE=\"WebLogic Server\"" - oracle && \
    su -c "cd /u01 && /u01/oracle/oracle_common/adr/unzip $CPUJULY2016" - oracle && \
    su -c "cd /u01/23094285 && /u01/oracle/OPatch/opatch apply -silent" - oracle && \
    # chown oracle:oracle -R /u01 && \
    rm /u01/$FMW_JAR /u01/$FMW_PKG /u01/$CPUJULY2016 /u01/oraInst.loc /u01/install.file

Before you start with the build process, make sure that you have all mentioned pre requirements from Bruno, e.g. the oracle/jdk:8 image.

[root@server] docker images
REPOSITORY          TAG                 IMAGE ID            CREATED             SIZE
oracle/jdk          8                   1fe717b7315d        15 minutes ago      520.1 MB

The next step will be to create your Oracle WebLogic Server Image, which now will include the current available Critical Patch Update, you should see during your build process following output:


Sending build context to Docker daemon 882.4 MB
Step 1 : FROM oracle/jdk:8
 ---> 1fe717b7315d
. . .
. . .
Oracle Interim Patch Installer version 13.3.0.0.0
Copyright (c) 2016, Oracle Corporation.  All rights reserved.

Oracle Home       : /u01/oracle
Central Inventory : /u01/oracle/.inventory
   from           : /u01/oracle/oraInst.loc
OPatch version    : 13.3.0.0.0
OUI version       : 13.3.0.0.0
Log file location : /u01/oracle/cfgtoollogs/opatch/23094285_Aug_30_2016_11_04_46/apply2016-08-30_11-04-43AM_1.log

OPatch detects the Middleware Home as "/u01/oracle"

Verifying environment and performing prerequisite checks...
OPatch continues with these patches:   23094285  

Do you want to proceed? [y|n]
Y (auto-answered by -silent)
User Responded with: Y
All checks passed.
. . . 
. . .
OPatch succeeded.
. . .

And now you got an Oracle WebLogic Server Image including the latest available Critical Patch Update :-)
But keep in mind, for future CPU's you might also include before the opatch apply step an update of the opatch utility, as from time to time Oracle requires a newer version of the opatch utility.


Monday, August 29, 2016

Oracle Forms Stand-alone Application Launcher (FSAL)

Since Oracle Forms 12c its possible to start your Oracle Forms without invoking a browser, this is called Oracle Forms Stand-alone Application Launcher (FSAL).

As pre requirement you will need either a JRE or JDK on your desktop, which should execute the Oracle Forms.

For this new Feature Oracle has integrated a short description Website within your installed and configured Oracle Forms & Reports Server 12c. The description website can be reached under following URL http://<your_server>:<port>/forms/html/fsal.html


Simply access this website from your desktop and download the frmsal.jar file to your desktop.

On your server hosting the Oracle Forms & Reports Server, access the formsweb.cfg and search for the section [standalone] or create a new section with a unique name.

[oracle@server] cd $DOMAIN_HOME/config/fmwconfig/servers/WLS_FORMS/applications/formsapp_12.2.1/config
[oracle@server] vi formsweb.cfg
-- Snippet from formsweb.cfg
[standaloneapp]
# Note: baseSAAfile must end with .txt
baseSAAfile=basesaa.txt
# definition of colorScheme
colorScheme=blaf
# My Start Form
form=t1.fmx
# fsalcheck parameter specifies whether to perform checksum comparison
# of Forms stand-alone app launcher or not. When it is enabled, it triggers
# the comparison at server. The checksum of FSAL at client machine will be
# compared with the checksum of FSAL archived at the server repository.
fsalcheck=true

After you have modified or created your own section for the FSAL, get back to your desktop, open a command prompt and navigate to the directory in which you have placed the frmsal.jar file. From there make sure that you have the java binary in your PATH and execute following command

java -jar frmsal.jar -url "http://<your_server>:<your_port>/forms/frmservlet?config=standaloneapp" -t 10000

You can also define within the parameter -url various options, e.g. .../forms/frmservlet?config=standaloneapp&colorScheme=teal

Depending on your formsweb.cfg section configuration you might see the typical login dialog.


or you will access directly your Oracle Forms Application.


And everything without any browser :-)

Monday, August 15, 2016

Oracle Reports 12c - The missing configuration steps

Oracle Forms & Reports 12c is released since a quite long time and I had now some chance to have a more detailed look on the Oracle Reports 12c component.

After you have successfully installed and configured the Oracle Forms & Reports 12c, you might find out that your Oracle Reports 12c is not working ... because its not yet configured, even you completed the Configuration Assistent successfully :-)

The following steps are describing the necessary tasks for Linux.

There some steps to take as "Post-Configuration":

  1. Create a Reports Tool Instance
  2. Create a Reports Server Instance
  3. if you are running under Linux 7 (either Oracle Enterprise Linux or RedHat) fix libXm.so.3 issue
  4. Adjust the Application Roles within your WebLogic Server Domain

Create a Reports Tool Instance

connect to your Linux server as oracle user and create the necessary Reports Tool Instance via WLST

[oracle@server] cd $ORACLE_HOME/oracle_common/common/bin
[oracle@server] ./wlst.sh
# replace the password with your password and verify if port 7001 is your Admin Server Port
wls:/offline> connect('weblogic','password','localhost:7001')
wls:/fr_domain/serverConfig/> createReportsToolsInstance(instanceName='reptools1',machine='AdminServerMachine')
wls:/fr_domain/serverConfig/> exit()

The above execution of the createReportsToolsInstance command will create under your DOMAIN_HOME following subdirectories:

  • reports/bin
  • reports/cache
  • reports/fonts
  • reports/plugins
  • reports/server
as next step we can create our Reports Server.

Create a Reports Server Instance

connect to your Linux server as oracle user and create the necessary Reports Server Instance via WLST

[oracle@server] cd $ORACLE_HOME/oracle_common/common/bin
[oracle@server] ./wlst.sh
# replace the password with your password and verify if port 7001 is your Admin Server Port
wls:/offline> connect('weblogic','password','localhost:7001')
wls:/fr_domain/serverConfig/> createReportsServerInstance(instanceName='rep_server1',machine='AdminServerMachine')
wls:/fr_domain/serverConfig/> exit()


libXm.so.3 Problem

in case you are using an Oracle Enterprise Linux 7 or RedHat 7, you need to fix a small libXm.so.3 problem. Oracle Reports is looking for the libXm.so.3, but under OEL 7 and RH7 you will find only a libXm.so.4
Simply perform following steps as root user on your Linux server

[root@server] cd /usr/lib64
[root@server] ls libXm.so*
libXm.so.4  libXm.so.4.0.4
[root@server] ln -s /usr/lib64/libXm.so.4 libXm.so.3

Startup your Reports Server Instance

since we have created the Reports Server Instance by attaching to the NodeManager, you must make sure that the NodeManager is up and running and than perform following steps:

[oracle@server] cd $DOMAIN_HOME/bin
[oracle@server] ./startComponent.sh rep_server1
. . .
Successfully Connected to Node Manager.
Starting server rep_server1 ...
Successfully started server rep_server1 ...
Successfully disconnected from Node Manager.

Exiting WebLogic Scripting Tool.

Done

Adjust the Application Roles within your WebLogic Server Domain

At first you need to login to the Fusion Middleware Enterprise Manager, normally http://<your_server_name>:7001/em and access under the menu "Security / Application Roles"


Within the Application Roles option chose from the drop down menu the option reports, than click on the arrow button, mark the line with the Role Name RW_ADMINISTRATOR and finally click the Edit button to modify the selected role


Under "Edit Application Role : RW_ADMINISTRATOR" use the Add button


In the Add Principal screen, select under the option Type "User", click the arrow button and mark the line with the Principal "weblogic" and proceed with the button OK


The last OK button will redirect you to the Application Roles screen, there simply click the OK button on the top right corner, when everything works fine you will get following Information


Now, you are able to access the Reports Status URLs by providing the username and password of the weblogic user

For Example
  • http://<your_server_name>:9002/reports/rwservlet/showenv?server=rep_server1
  • http://<your_server_name>:9002/reports/rwservlet/getserverinfo?server=rep_server1